Category: Makeup

  • Nail Color Trends For Spring 2025: Your Guide To The Hottest Trends

    Nail Color Trends For Spring 2025: Your Guide To The Hottest Trends

    When the winter chill finally melts away, it’s time to freshen up your look—from your clothing choices right down to your fingertips. This year, your nails are about to become your favorite accessory, sporting colors that speak volumes about your style, mood, and creativity. Curious about which hues will rock the scene in Spring 2025? You’re in luck! We’ve got the full scoop on everything from pastel palettes to edgy new metallics.

    Whether you’re prepping for prom, planning a big trip, or just need something fresh for your everyday life, these nail colors (and some quick tips) will help your manicure game thrive. Best of all, we’re doing it in a fun, relatable way—like a best friend dishing the latest. So grab a comfy seat, maybe a glass of lemonade, and let’s dive into the wonderful world of Spring 2025 nail color trends!

    (Disclaimer: If you’re under 18, be sure to check with your parents or guardians before going all-in on any fancy polishes or making big beauty purchases. But hey, a little planning never hurt anyone!)

    1. Soft Pastels: Because Spring Calls For Subtle Vibes

    When you think of Spring 2025, you might imagine pastel clothing, blossoming flowers, and a general sense of renewal. Well, guess what? Your nails can mirror that mood perfectly. From milky lavender to baby blue and pistachio green, these gentle shades whisper “fresh start” without screaming for attention.

    Nail Color Trends for 2025, Soft Pastels: Because Spring Calls For Subtle Vibes
    Instagram@brite.sg

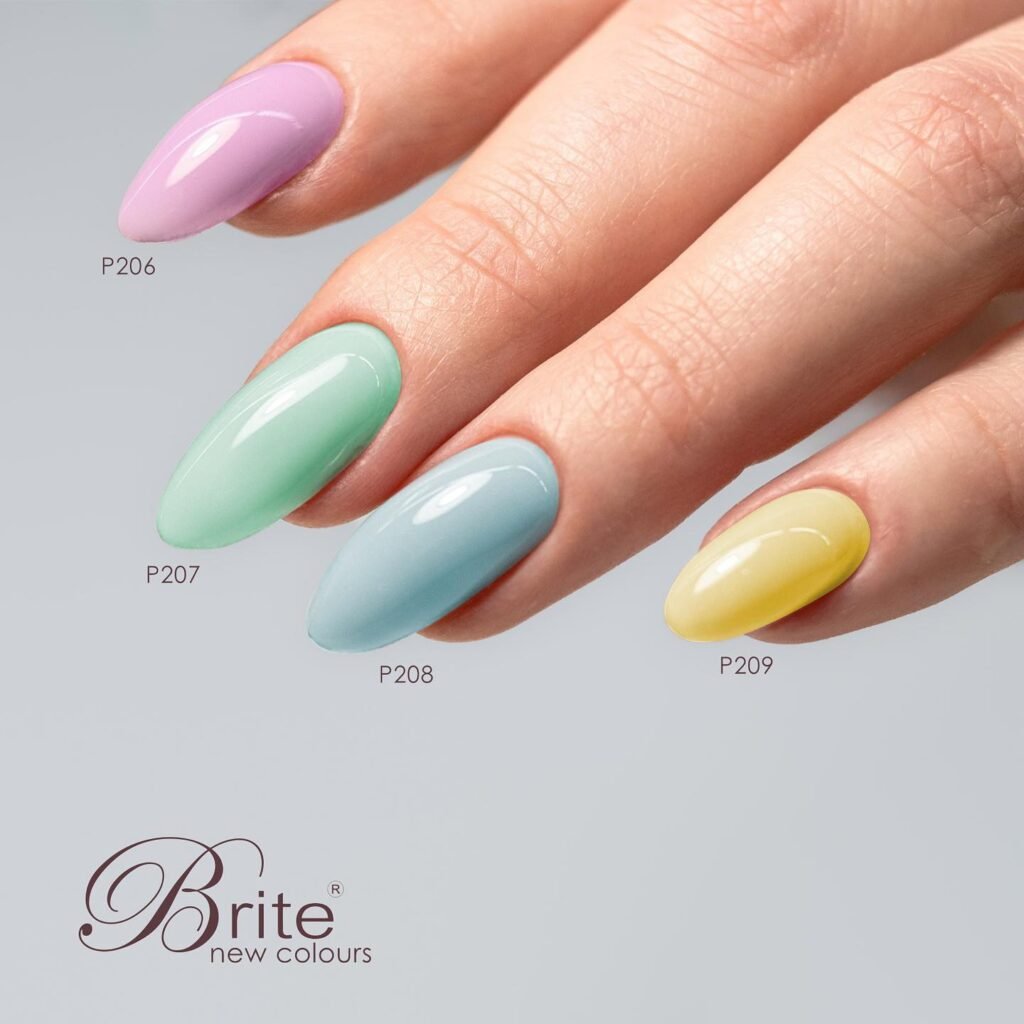
    Why Pastels Are Perfect

    • Easily Matchable: Pastels pair well with a variety of outfits, whether you’re into boho dresses or sporty streetwear.
    • Low-Key Chic: They look sophisticated but also sweet. Perfect for school days, part-time jobs, or casual weekends with friends.
    • Versatile: Light colors allow you to play around with nail art. Try adding tiny flowers, polka dots, or geometric shapes.

    Pastel Hack: If you’re worried a pastel polish might be too sheer, layer a white base coat first. This helps the color pop without needing a million coats of polish.

    2. Retro Metallics: For Those Who Love A Shimmering Edge

    If you’d rather stand out like a neon sign at midnight, metallics are your new best friend. But it’s 2025, so the typical gold and silver have gone retro—think iridescent chromes that shift color as you move, or grunge-inspired metal shades reminiscent of your parents’ old rock band posters.
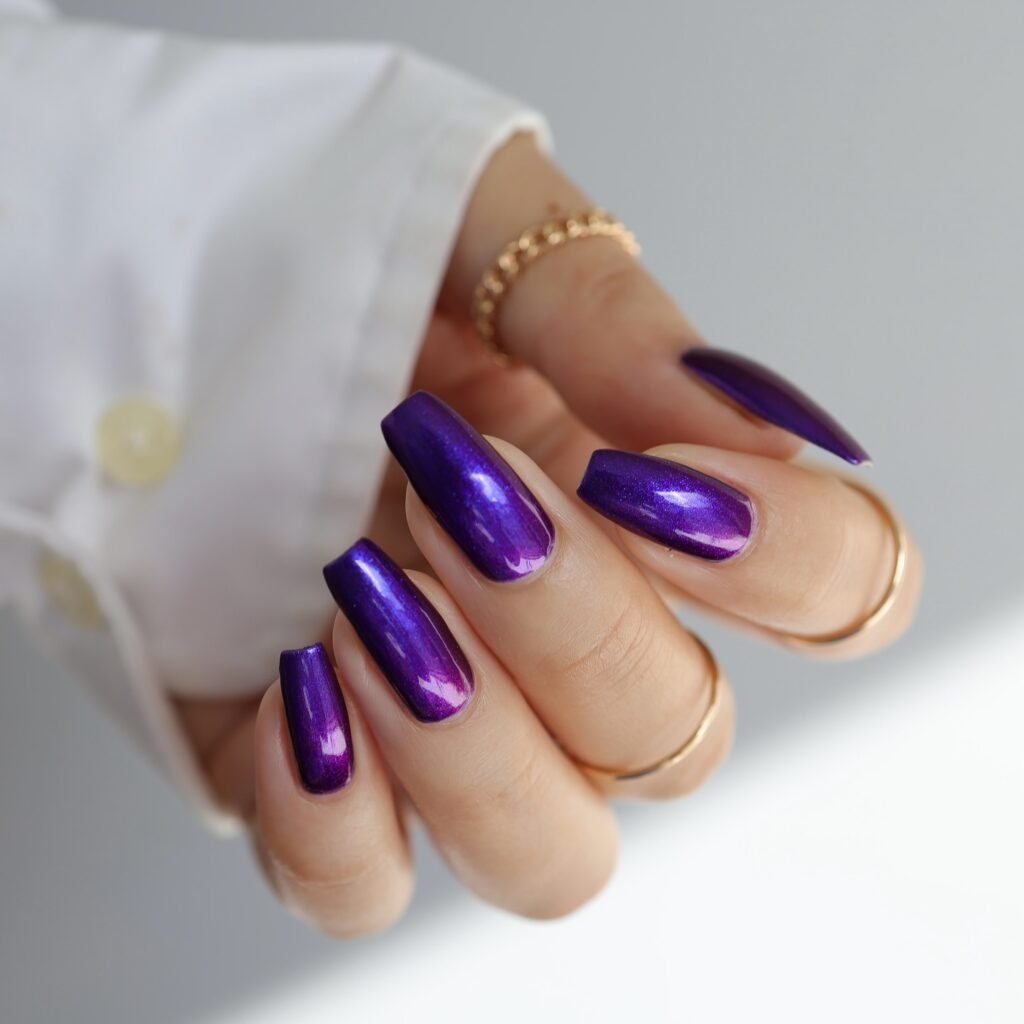
    Nail color trend for metalic retro
    Instragram@polishedbookworm

    Color Suggestions

    • Rose Gold Chrome: Because who doesn’t love that pinky, shimmery reflection?
    • Bronzed Copper: A warm metallic that looks stunning on any skin tone.
    • Holographic Silver: Catch the light at every angle and reflect a rainbow wherever you go.

    Metallic Hack: Metallic polishes can show brush strokes easily. Try applying them in smooth, even layers or use a sponge technique to minimize streaks.

    3. Jelly Nails: Bold, Bright, & Transparent

    Remember when jelly sandals were a huge thing? Picture that same transparent yet vibrant vibe on your nails. These polishes typically come in bright pinks, oranges, yellows, or even vibrant purples, but with a see-through finish that’s playful and unique.

    Jelly Nails Another 2025 - nail color trends
    Instagram@pop_polished

    Reasons To Love Jelly Nails

    • Fun Factor: They’re basically the bubble tea of nail trends—fresh, fun, and oh-so-2025.
    • Layering Options: Mix different jelly colors on one nail for a tie-dye effect.
    • Short or Long? Works with all nail lengths. On short nails, it’s cute and subtle; on long nails, you’ll have that “glass tip” effect.

    Jelly Hack: If you want extra shine, top it with a high-gloss top coat. The transparent finish will look even more like candy.

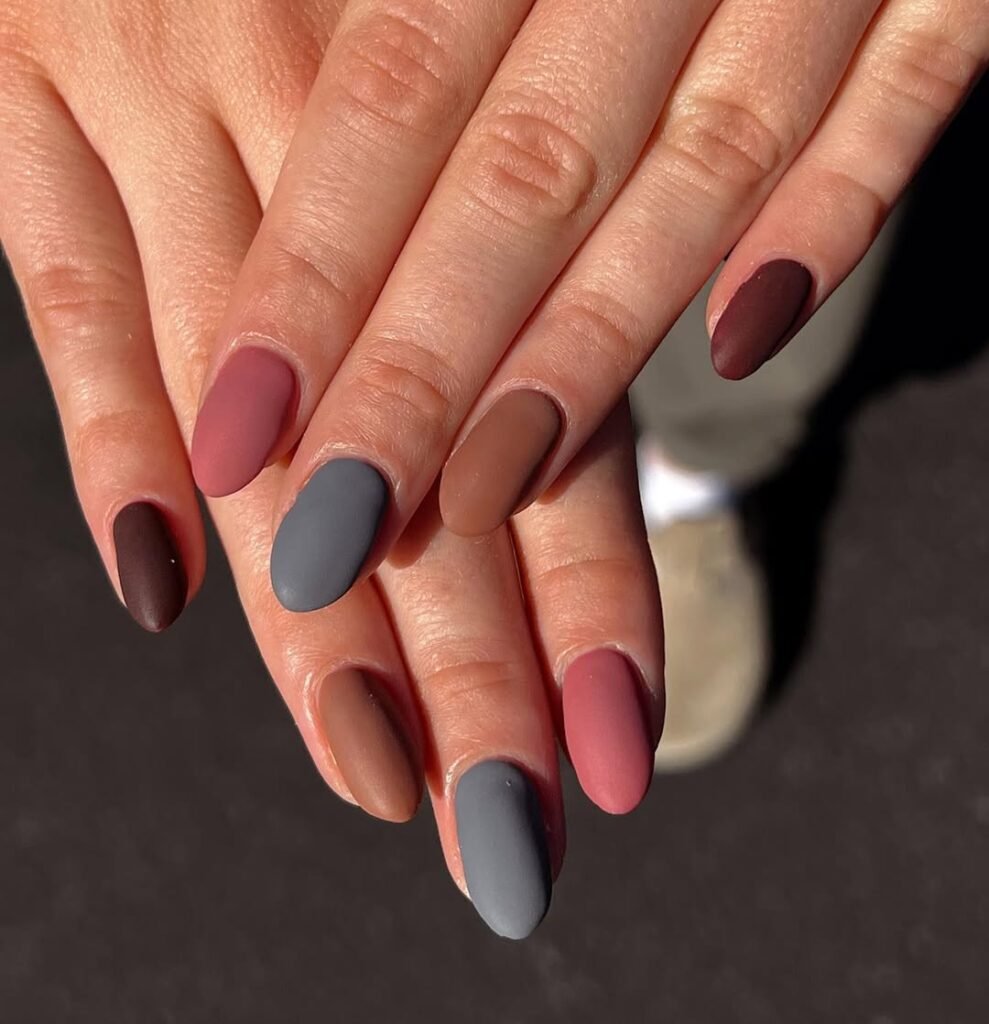
    4. Earthy Neutrals With A Twist

    Sometimes, you want nails that coordinate effortlessly with anything. That’s where neutral shades shine—beige, taupe, and dusty rose are always in style. But Spring 2025’s twist? Adding a hint of soft green or muted terracotta to the neutral family.
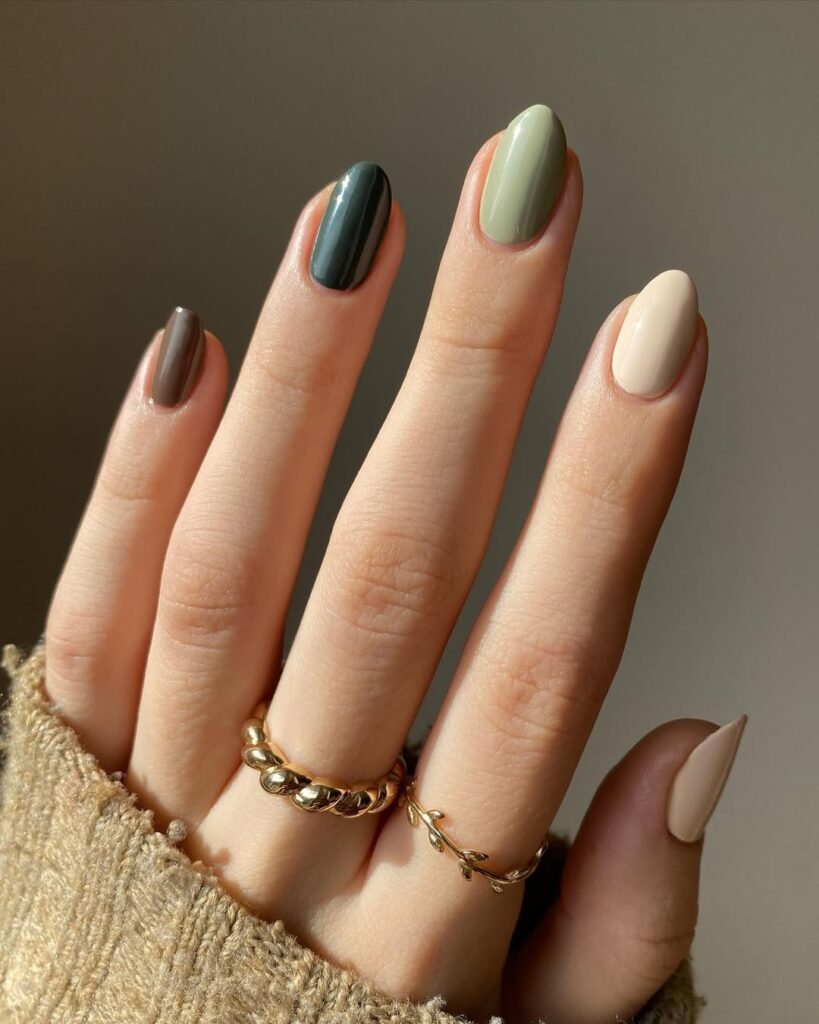
    Earthy Neutrals Nails
    Instagram@polished_yogi

    Try These Shades

    • Clay Brown: A warm, earthy hue that complements casual jean outfits.
    • Soft Olive: Not quite green, not quite brown—perfect middle ground for nature lovers.
    • Dusty Peach: A cross between pink and nude, giving a subtle warmth.

    Neutral Hack: Pair a neutral mani with one accent nail in a bolder shade—or even a simple metallic stripe—to keep it interesting without going full-blown “look at me!”

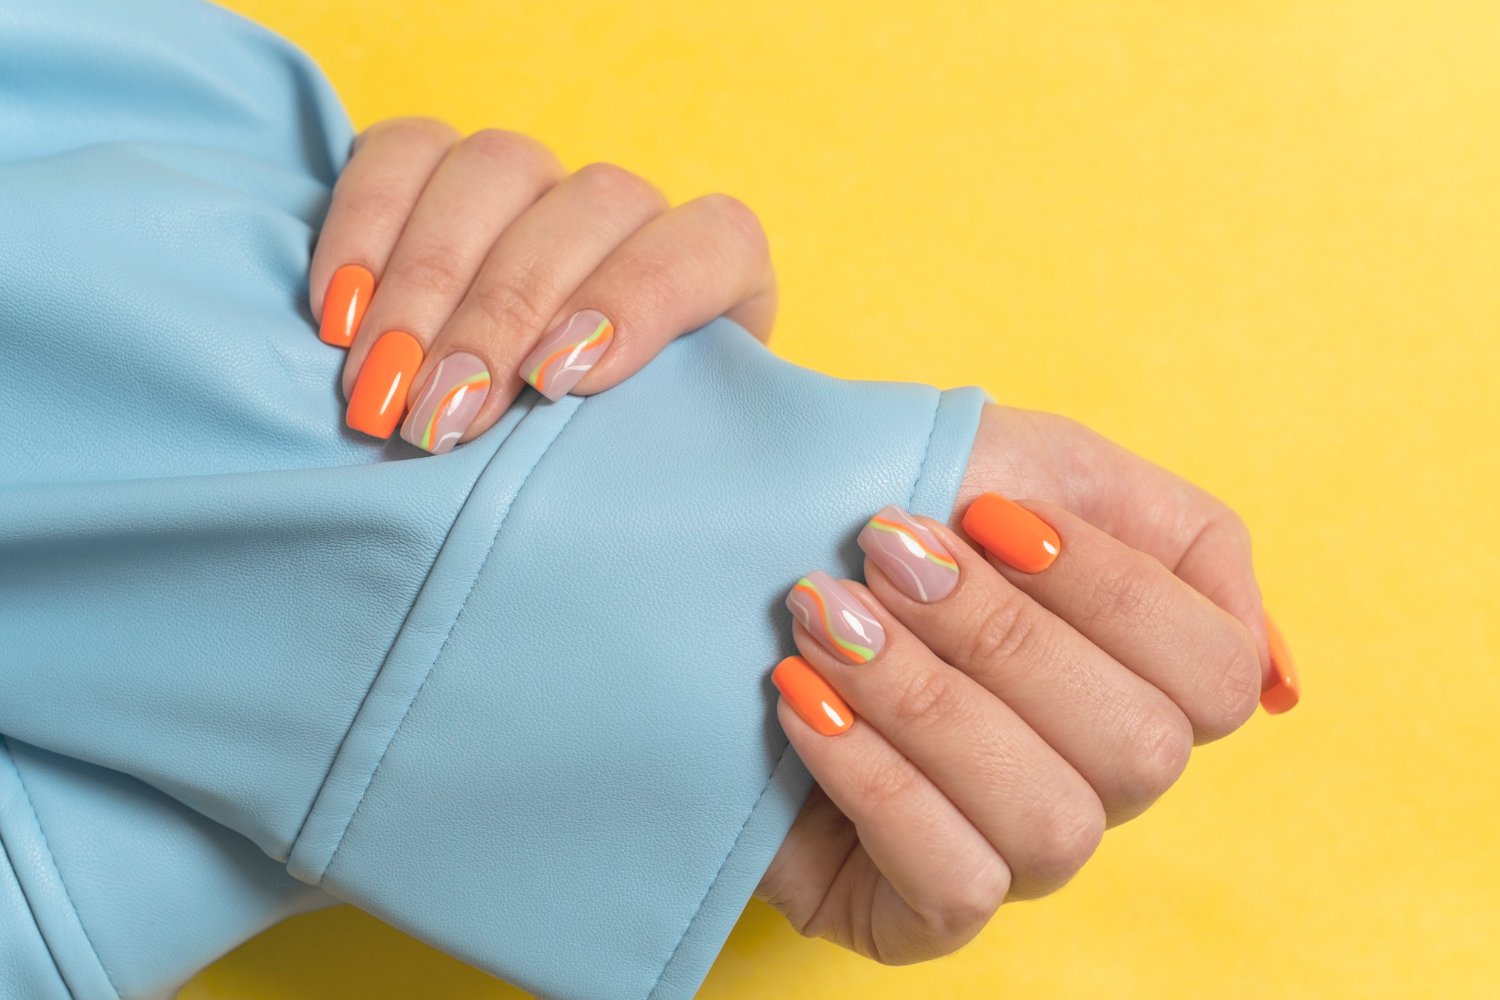
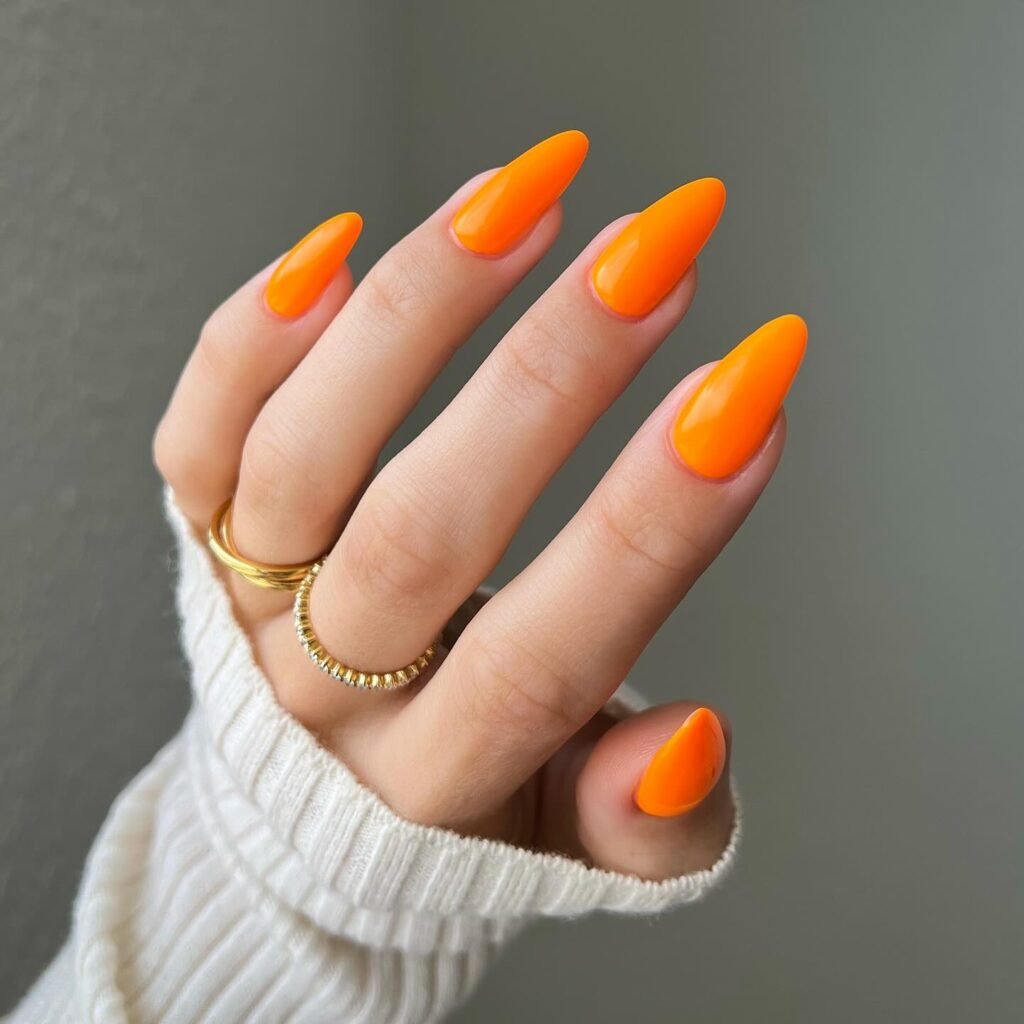
    5. Neon Sparks: Bringing The Party To Your Fingertips

    For the nights when you want your nails to speak louder than your outfit, neon is here to party. Neons can feel intimidating, but picking the right shade can boost your confidence and turn a simple jeans-and-tee combo into an Insta-worthy fit.

    Neon Sparks
    Instagram@dndgel
    • Hot Pink: The ultimate “I’m here!” color. Great for concerts or weekend adventures with friends.
    • Day-Glo Orange: Screams summer vibes and tangy fun.
    • Electric Lime Green: 2025’s version of the classic “90’s rave” look, perfect for festival season.

    Neon Hack: If you’re worried about looking “too bright,” try a neon French tip style—keep most of the nail neutral, then paint the tips neon for a subtle but cool effect.

    6. Textured Finishes: Velvet, Matte, & More

    Let’s face it—sometimes glossy nails get boring. Enter textured polishes like velvet finishes, sandy textures, or matte topcoats that transform any shade into something fresh.

    Matte Polish

    • Pros: Understated elegance, perfect for a classy look.
    • Cons: Shows imperfections and chips a bit more easily.

    Velvet Polish

    • Pros: Creates a plush, unique feel (and look) reminiscent of actual velvet fabric.
    • Cons: Usually best for special events—velvet textures can wear off faster in daily life.

    Sand or Sugar Finish

    • Pros: Grainy polishes add an edgier twist to pastel or neon shades.
    • Cons: Might catch on clothing if you apply it too thick.
    Matte Polish
    Instagram@mynailgirlness

    Texture Hack: If you already own a bunch of glossy polishes and want a matte effect, buy a matte topcoat. Voilà—one product can transform your entire nail polish collection.

    Tips For Perfect Application & Long-Lasting Shine

    No matter which color or texture you choose, technique matters:

    1. Prep & Cleanse
      • Wash your hands and nails thoroughly, removing any old polish or oily residue.
      • Push back cuticles gently (avoid cutting them if possible—snips can lead to infection or wonky nail growth).
    2. Base Coat
      • Helps your polish adhere better and prevents staining, especially with dark or neon shades.
    3. Thin Coats, Multiple Layers
      • It’s better to apply two or three thin layers than one goopy coat. This reduces smudges and speeds drying.
    4. Top Coat = Must
      • Seal your masterpiece with a glossy or matte top coat to extend wear and add a professional finish.
    5. Touch-Ups
      • Keep a bottle of quick-dry topcoat or polish remover pen handy for small fixes.
      • If a nail chips on day 3, patch it up rather than removing everything.

    Pro Tip: If you’re in a hurry and accidentally smudge a nail (we’ve all been there), dip a fingertip in nail polish remover and gently smooth the smudge. Then reapply a thin coat. It’s a handy quick-fix that might salvage your mani!

    DIY Vs. Salon: Which Route Suits You Best?

    DIY Pros & Cons

    • Pros:
      • Cost-effective (buy a few polishes, reuse them for months).
      • Experiment with different styles at your own pace.
      • Feels more personal—like a mini spa day at home.
    • Cons:
      • Requires some skill (or patience) to achieve a pro-level finish.
      • Drying time can lead to accidental smudges.
      • Might be messy if you’re new to painting nails.

    Salon Pros & Cons

    • Pros:
      • Professional finish, quick drying methods, and fancy designs.
      • Options like gel polish for a durable, long-lasting manicure.
    • Cons:
      • Costs can add up, especially for frequent visits.
      • Gel or acrylic treatments need special removal, or it can damage your nails.
      • Requires scheduling and sometimes waiting in line.

    Verdict: Mix it up. If you love creative expression and have time to learn, DIY is fun. For special occasions, or if you want that fancy 2025-themed design, a salon can be a lifesaver.

    Fun Ways To Personalize Your Nail Look

    Even if you pick the “perfect” polish shade, adding personal touches can make your nails truly stand out:

    • Stickers & Decals: From stars to mini daisies, there’s a sticker for every taste. Quick fix for a major style pop.
    • Freehand Nail Art: Feeling artsy? Grab a fine-tipped brush to draw small patterns or shapes. Polka dots are easy; cartoon characters might require more skill (but go for it if you’re bold!).
    • Ombre Gradients: Use a sponge to blend two or three colors seamlessly. Perfect for pastel or neon transitions.
    • Jewels or Studs: Tiny rhinestones near the cuticle can glam up a neutral shade.
    • Custom French Tips: Instead of white, try a metallic or neon tip on a neutral base. Super chic!

    Tip: Always seal delicate designs with a topcoat to prevent them from chipping or peeling off too soon.

    Confidence Is The Best Polish

    Spring 2025 is shaping up to be a year of adventurous, colorful nail trends. From pastel calm to neon boldness, from metallic brilliance to textured finishes, there’s something for everyone. Want subtle? Go for soft olive or dusty peach. Feeling daring? Neon pink or holographic silver might be your jam. Remember to factor in your hair porosity if you want to coordinate your overall style—soft, pastel nails can match a low-porosity hair routine that loves lighter products, while bold, vibrant polishes might align with high-porosity hair that thrives on heavier moisture.

    Even if you change your nails every week (guilty as charged?), the biggest takeaway is to enjoy the process. Nails are a small canvas for self-expression—one you can switch up at the drop of a hat (or the snap of a topcoat). So experiment fearlessly, embrace your unique preferences, and, most importantly, have fun.

    After all, the best part about nails is that mistakes can be wiped away with polish remover, and you get a fresh slate to try again. Whether you’re going at it solo in your bedroom or booking an appointment at your local salon, let your nails tell your story. Because in the end, confidence—and maybe a killer base coat—truly is the best polish of all.

  • How to Perform a Sexy Brown Eye Makeup Style

    Prepare eyelid make-up using the base under the shadows. As a result, the colors become more intense and eye makeup will be long lasting. From the outer corner of the eye to about two thirds the length of the upper eyelid, apply obliquely dark shadow in the cream. Emphasize the outer part of the lower eyelid.
    sexy eye makeup[hr][/hr]
    Rub cream shadow, using the soft brush. Apply a dark brown matte shadow in the outer corner of the eye, forming the letter “C”, including an outer upper lash line and the collapse of the eyelid. Put it in the outer portion of the eye.
    sexy eye makeup style[hr][/hr]
    Accentuate the inner corner of the eye golden shadow and drag it towards the center of the eyelid. The internal area of the eye, at the base of the nose, also illuminate the golden shadow. All bleached areas additionally coat with gold glitter.
    sexy eye makeup[hr][/hr]
    Rub the boundaries between the shadows and darken the outer part of the eye with a dark brown shade. Draw the upper and lower lash line in black crayon. Highlight it as a line of water in the eye.
    sexy eye makeup[hr][/hr]
    Mouth leave neutral, and contouring to customize the features of your face using bronzer.[hr][/hr]

    Final Result

    sexy eye makeup[hr][/hr]

    Note:

    The final shape of makeup will therefore depend on the shape of the eye and the position of the outer corner of your brows.

    sexy eye makeup

  • Nail Art for Valentine Day

    Nail Art for Valentine Day

    For Valentine’s Day 2014, we did a small tour of nails. Like our special manicure tutorial, you get a nail art in the form of heart on the nail’s tip.

    You have everything you need on hand to spend a memorable Valentine’s Day . But have you thought of everything down to the smallest detail? And what about your hands? We may have the ideal and original solution. You still have a chance to do nail art.

    To create this nail art simply choose the color of your choice. For your convenience we share some pictures of nail designing.

    We hope these pictures give you some ideas to make you a stunning look for the evening of Valentine’s Day.

  • Valentine Day Makeup

    Valentine Day Makeup

    Valentine makeupValentine’s Day 2014 is fast approaching, this day may also be an opportunity to celebrate the love that exists in your relationship. Or even to rekindle the flame that is a little off. So in this case, nothing better than primping to charm your sweetheart.  But then, a romantic makeup 🙂 we give you some ideas.

    Valentine’s Day is the perfect day to get out. And you have planned a slumber party on Valentine’s Day or a restaurant with your guy, you’ll want to get pampered. And this is normal! Us girls, we love to be beautiful and look after our appearance, especially to celebrate the feast of love.

    Version matte red lipstick gives a very delicate and romantic velvet effect to your lips. The pink lipstick is also a good choice for Valentine’s Day 2014.

    We hope this gives you some ideas to make you a flawless beauty look for the evening of Valentine’s Day and reminds you of the famous saying “Less is more” never lose sight of your natural beauty!

    So here we share few Valentine’s day makeup video tutorials for you to make a romantic beauty and girly look.

  • Stunning Makeup Tips for Colored Eyes

    Stunning Makeup Tips for Colored Eyes

    eye makeup tipsThe look and the smile are vital components for beauty, for this we have to try to exploit them in the right way using the colors. And then … eyeshadow from the most varied shades, colored powders for the face, lipsticks light, dark, shiny and pearly…
    We use makeup as a tool, a mean by which we can feel more feminine, more beautiful in the midst of others. Good makeup highlights our physical characteristics and hides some small flaws… thanks to makeup 🙂
    Eye make-up is not easy! It’s still possible to follow some basic tips to harmonize form and color. For eye makeup, it is important to take into consideration the color of the skin, eyes, hair, clothing and accessories.

    Amazing makeup tips for ladies with blue eyes

    Eyeshadow:makeup tips
    Grasp the idea of violet eyeshadow to highlight the respective color of your eyes. Lavender is suitable for daytime, although plum is a fantastic choice for nighttime. For special occasions, blue-eyed women also can try metallic (both silver and gold), turquoise and icy pink eyeshadow. For the office, stay with brownish, floral, terracotta and basic shades of eyeshadow. For smoky eye makeup, charcoal gray or purple shadows will look awesome.

    Mascara:
    Dark blue and navy blue mascara looks fantastic on blue eyes.

    Eyeliner:
    Charcoal eyeliner looks remarkable on blue eyes.

    Blush:
    Apply gentle sweep of blush in a natural color.

    Lip color:
    Select a matte lipstick in a peachy brownish color or a soft pink.

    Best makeup tips for females with brown eyes

    tips for eye makeupBrown eye is just one color that works well with a lot of eyeshadow colors. Black and brown eyeliner looks adorable on brown eyes. Brown eyeliner is ideal for daytime while black in night. Apply dark brown eyeliner together with light eyeshadow to set focus on your eyes. Brown-eyed women must consider metallic silver eyeshadow combined with metallic plum eyeliner to get attractive look.

    • If you have dark brown eyes use plum, natural green and charcoal gray shades of eyeshadow.
    • If you have medium brown eyes must use green, violet or bronze shades. Almost all eyeshadow colors suits on medium brown eyes.
    • If your eyes have light brown color use dark brownish eyeliner instead of black. Apply natural shades of eyeshadow to look prettier.

    Incredible makeup tips for women with green eyes

    makeup tips for colored eyesEyeshadow:
    Use purple, deep plum and grayish-lavender shades in your eye makeup. In evening functions bronze, copper and gold eye shades look fabulous on green eyes.

    Mascara:
    Brown mascara looks good on green eyes.

    Eyeliner:
    Charcoal and chocolate brown eyeliner suits on green eyes.

    eye makeup tips

  • Tips to Apply Makeup Primer

    Tips to Apply Makeup Primer

    In our string, almost everything ends up on perfect makeup in order to enhance your beauty. Before you access to eye shadow, mascara or lipstick, an even complexion is a perfect base for a beautiful finish. Without wasting any time, talking about other cosmetics, we straightly move towards the initial thing of makeup – which is a PRIMER. It gives an excellent start to our makeup. The search and choice of correct primer according to your skin tone is very important, because it’s the basic step towards the alpha and omega of perfect beauty. They are for every skin type – whether dark or light, oily or dry.

    Modern products are genuine all-rounders: they can act fine pores, reduce wrinkles and protect the delicate facial skin. So if a primer is properly selected and applied, it leaves every complexion radiate, healthy and even.

    [tip number=”1″]However, it is not easy to make a beautiful, natural-looking makeup itself. If you want to avoid the dreaded mask-like look, apply as thin as possible, because the thinner the layer, the more natural outcome.[/tip]

    [tip number=”2″]To get a natural, even complexion, it is advisable to apply several thin coats of primer in sequence. Although this is very time consuming, because each layer must be well dried before the next is applied. For this patience, you will be rewarded with a perfect, natural-looking makeup.[/tip]

    [tip number=”3″]Use a sponge to achieve most consistent results. And for more coverage apply it directly with your fingers.[/tip]

    [tip number=”4″]Do not apply too much primer because its right amount decides whether your makeup looks natural or unnatural at the end.[/tip]

    [tip number=”5″]For extra durability, the primer should be dusted at the end with a transparent powder.[/tip]

    Advantages

    • It provides flawless skin for makeup
    • Help skin pores to reduce
    • Covers skin defects and control oil
    • Helps the foundation stay longer
    • Helps to prevent creasing in makeup
    • Makes foundation mixing effortless

    4 Steps to Apply

    1. First, you should clean your face thoroughly.
    2. Then apply a moisturizing day cream. Let it penetrate into your skin for at least 10 minutes. This will prevent the mixing of day cream with the primer product.
    3. Always apply primer from the center of your face to outwards.
    4. Wait for few minutes, then you can apply foundation on your face and other makeup.
  • How to Apply Mascara – Tips

    How to Apply Mascara – Tips

    Eyes are the most beautiful, prominent and sensitive part of our face and during make-up we pay greater attention to our eye make-up. Eye make-up makes our eyes much prettier and gives a beautiful & attractive look to the viewer. In eye make-up mascara plays an important role to enhance the beauty of our eyes. So, today we will discuss that what is mascara & how to apply it properly? and few tips related to our topic.

    Mascara:

    Mascara is a substance used as a cosmetic to color the eyelashes and sometimes eyebrows, applied with a brush.

    Why we use it?

    When we talk about eye make-up the very first thing among make-up products comes in our mind is mascara. It not only beautifies the eyes but also make it attractive dramatically.
    We can also say that its basic purpose it to darkening, coloring, lengthening, thickening and define the eyelashes.

    Types:

    The type of mascara depends on the brush and what you are trying to achieve.
    There are two types of brushes:-

    1. Full brushes
    2. Fine brushes

    Full brushes are used for average length lashes while fine brushes for those who have sparse or short lashes.
    Other types are as follow:-

    • Volume mascaras
    • Mascaras with waterproof formula
    • Lengthening mascaras

    The volume mascara gives you dense lashes while lengthening mascaras will create longer lashes.

    Things you’ll need:

    1. eyelash curler
    2. good quality waterproof mascara
    3. eyelash comb
    4. mirror
    5. ear bud & tissue paper

    How to apply mascara:

    Here are few easy steps which will be helpful for you:-

    • Firstly bind your hair before going to apply mascara, so that the hair does not interfere when apply the liquid.
    • Mostly we have straight eyelashes so curl them with the help of eyelash curler.
    • After curling the lashes use an eyelash comb to separate out clumped eyelashes.
    • Now squeeze out the mascara brush from the bottle and keeping a steady hand to apply it on the upper lashes first and let it dries properly before applying to lower lashes.
    • For dense or thick lashes let the first coat of mascara dry then comb them with eyelash comb to separate them out, after this apply its second coat and get your desired eyelashes.
    Here I also add a video tutorial for your better understanding;

    Tips:

    1. To remove the smudged traces of the mascara use an ear bud dipped in baby oil and gently rub the affected area.
    2. Put a business card or a tissue paper behind the upper lashes and under the lower lashes to prevent getting mascara on the lids or cheeks.
    3. To give a thicker look to your lashes apply a black eyeliner on the upper waterline for a nice subtle difference.

    Avoid:

    • Do not blink your eyes until it dries up.
    • Never apply mascara without using a mirror.
    • Don’t apply too many coats of mascara.

    Related articles:


  • How to wear Red Lipstick

    How to wear Red Lipstick

    In our previous article ([intlink id=”1276″ type=”post” target=”_blank”]Proper Application of Lipstick[/intlink]) we have learned a proper way of lipstick application. But in this article I want to show you that how can we get beautiful and elegant red lips by applying red lipstick, because red lips never go out of style. Now the question arises that how we can  get perfect red lips?

    how to apply red lipstick

    Things you’ll need

    Firstly you should know that which things are required:-

    How to Apply Red Lipstick

    how to apply red lipstickHere are the steps to apply perfect red lipstick:-

    1. Firstly apply any good moisturizer on your [intlink id=”591″ type=”post”]lips[/intlink].
    2. After few minutes blot-off the moisturizer with a tissue.
    3. Now start applying red lip liner from the center of your lips.
    4. Take red lip stain and apply on your lips not going over the lip liner.
    5. When it dries apply another coat of lip stain.
    6. Let it dry again and then fill up your lips with red lip liner.
    7. Shape your lip line again.
    8. Now apply pure red lipstick with the help of a lip brush.
    9. Now blot it again with a tissue and apply second coat of lipstick.
    10. Blot it again.
    11. Now apply a final coat of red lipstick.

    Tip to look elegant by applying red lipstick

    When you apply red lipstick, it is best to keep the rest of your makeup light/minimum so that your lips looks prominent, beautiful and the focus of your look.

    Here I also share a video tutorial, hope it will be helpful for you in the application of red lipstick.

    Here is the video:-

    Related Red Lipstick Application Articles

  • Proper Application of Lipstick

    Proper Application of Lipstick

    Lips are the most sensitive, attractive and beautiful part of our face, we must say that lips are the important focal point of our face. So we must take care of them. Lips have their own natural beauty and lipstick make them more beautiful and pretty. So, firstly we should know what are lips, lip line and how we can make them attractive by applying lipstick?

    Proper application of lip stick

    Lips

    Lips are the two fleshy parts or folds forming the margins of the mouth and functioning in speech.

    how to apply red lip stickLip line

    Lip line is the edge of the pigmented area of the lips. Some people have a clear and perfect lip line, while others don’t.

    Kinds of Lips

    There are different kinds of lips which are as follow:-

    • Thin[intlink id=”591″ type=”post”] Lips[/intlink]
    • Full Lips
    • Lips that are Thin on the top and Full on the bottom
    • Bow shaped Lips

    Lipstick gives a final touch to the [intlink id=”1209″ type=”post”]makeup application[/intlink]. It makes our lips attractive depending upon that how we apply lipstick and much it suits on our lips? so we must know that what is a lipstick? and the proper way of its application.

    Lipstick

    lipstick

    Lipstick is a crayon like oil-based cosmetic used in coloring the lips.

    Things you’ll need

    • Lipstick
    • Lip brush
    • Lip balm
    • Lip liner
    • Tissues
    • Mirror

    Tips

    1. Daily apply [intlink id=”493″ type=”post” target=”_blank”]honey[/intlink] to your lips to nourish and moisturize them.
    2. Apply a lip balm to keep your lips soft.
    3. Always use a brush for the application of lipstick.
    4. Always use a fresh shaped lip pencil.

    lipstick

    Avoid

    1. Don’t rub your lips together after applying lipstick.
    2. Never use lip liner which is too dark than your lipstick color.

    Here I share a video tutorial which will be definitely helpful for you in the application of lipstick.

    Here is the video

    Related lipstick application articles

  • How to apply Makeup

    How to apply Makeup

    All the girls and women are gifted by natural beauty but they enhance their beauty with the help of makeup. So we must know that what is makeup and how to apply it on our face in a beautiful manner?

    Makeup is the application of cosmetics to the face to improve or change your appearance.

    make-up

    Makeup types

    Few types are as follow;

    1. Fashion Makeup
    2. Bridal Makeup
    3. High Definition
    4. Special Effects Makeup (FX Makeup)
    5. Theatrical Makeup
    6. Airbrushing

    Things you’ll need

    make-up

    Certain things are required to apply makeup which are listed below

    Here I share some makeup video tutorials which will be definitely helpful for you in the application of makeup. These videos will show you different type of makeup according to events or occasions.

    Here are the videos

    Related makeup articles

    How to Apply Makeup in 10 Easy Steps
    Complete Makeup Process
    Make Up
    Make-up